Survey
of the day

Siphoners have their say!

Autoren

Cengiz Kulaksiz

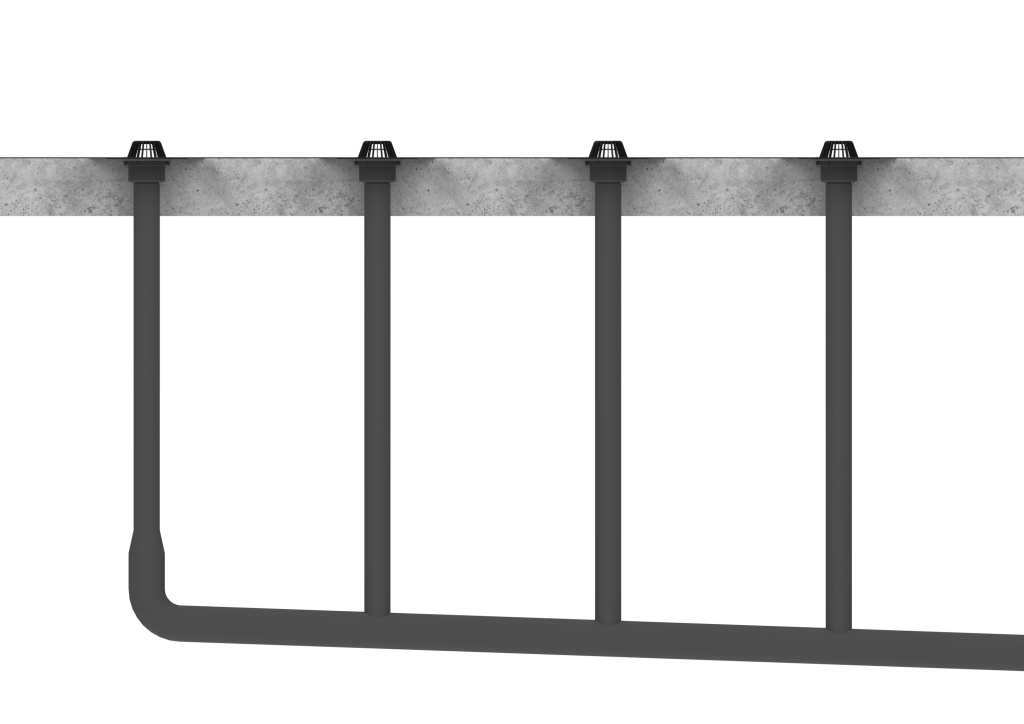
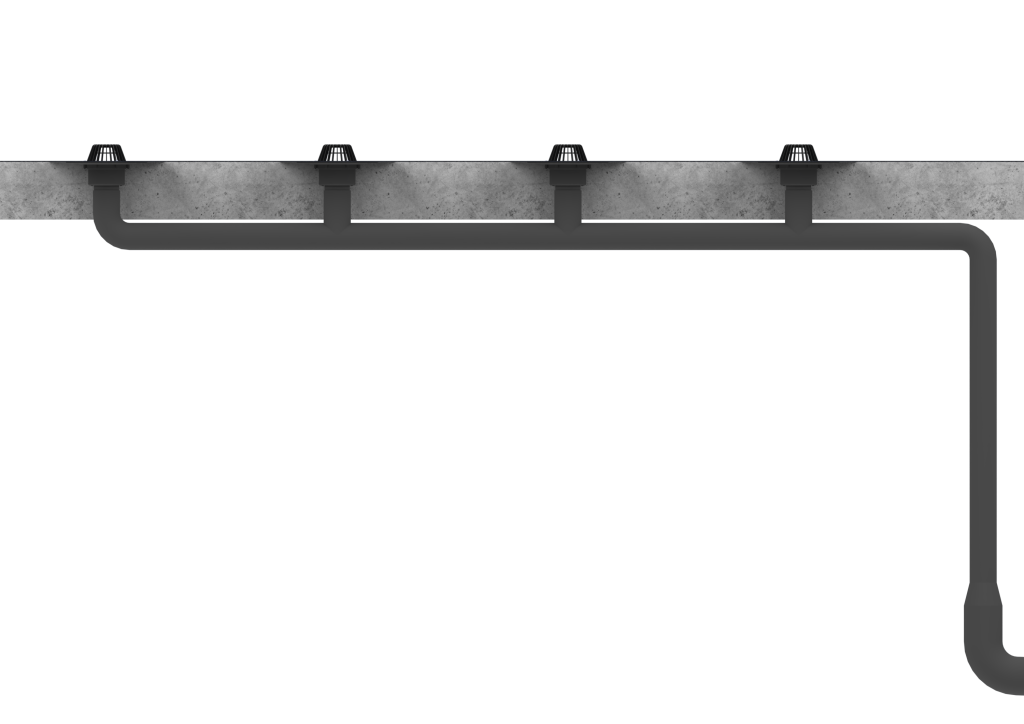
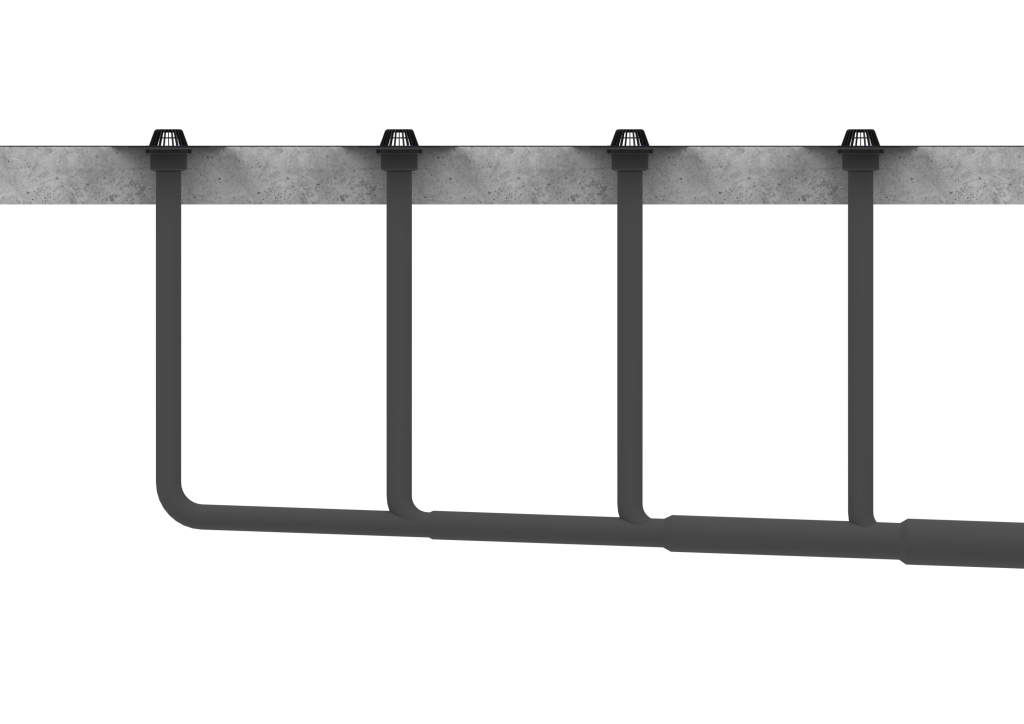
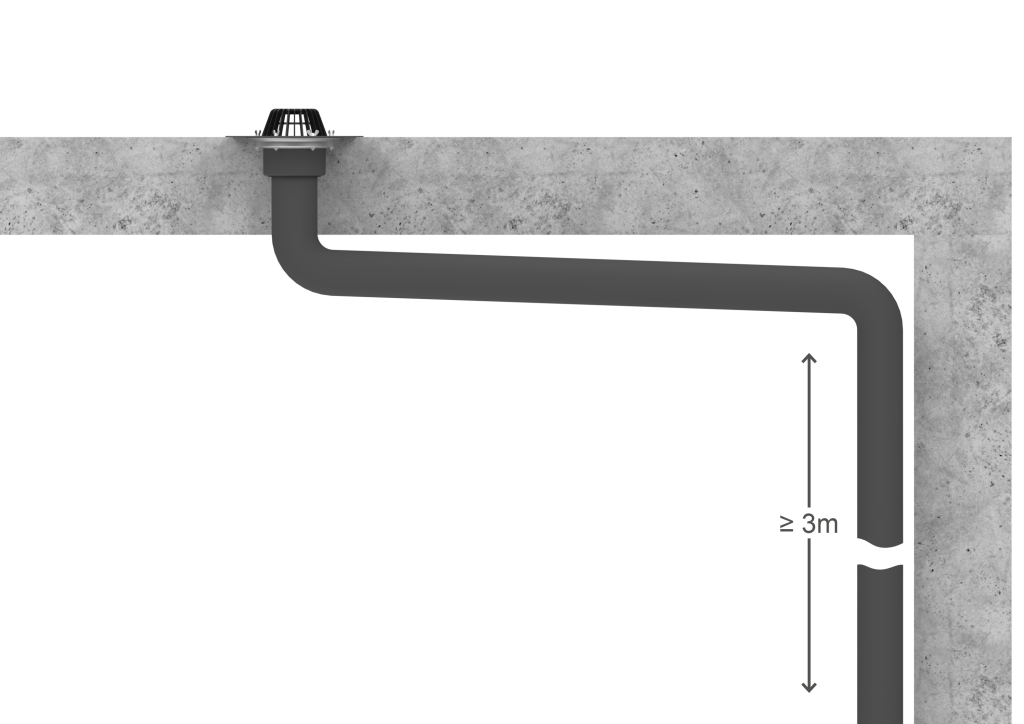
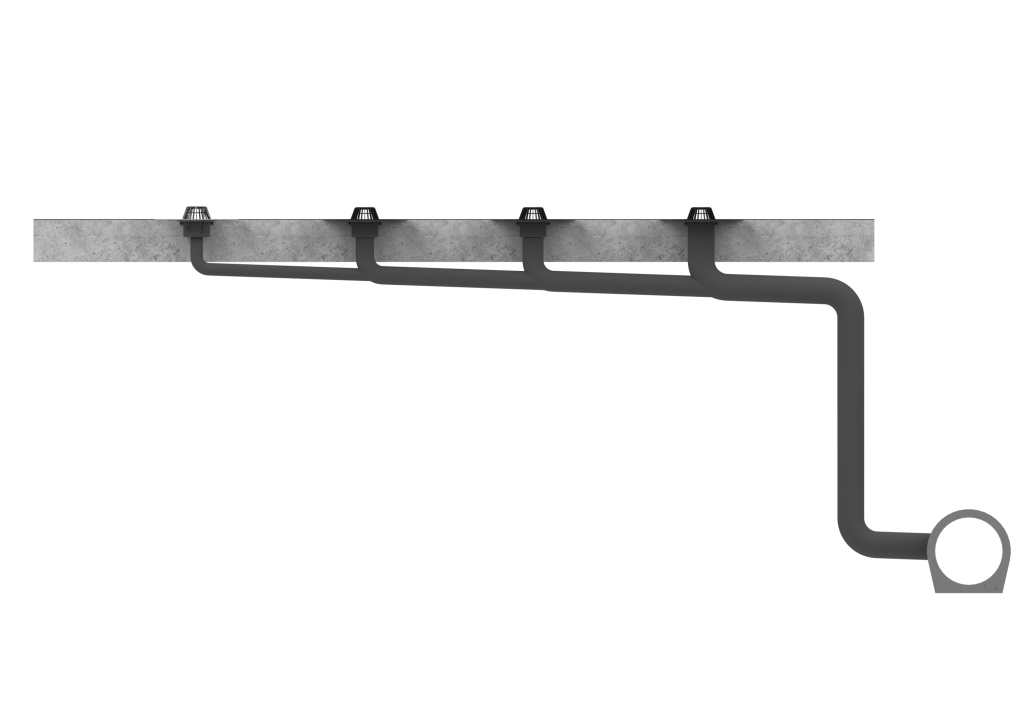
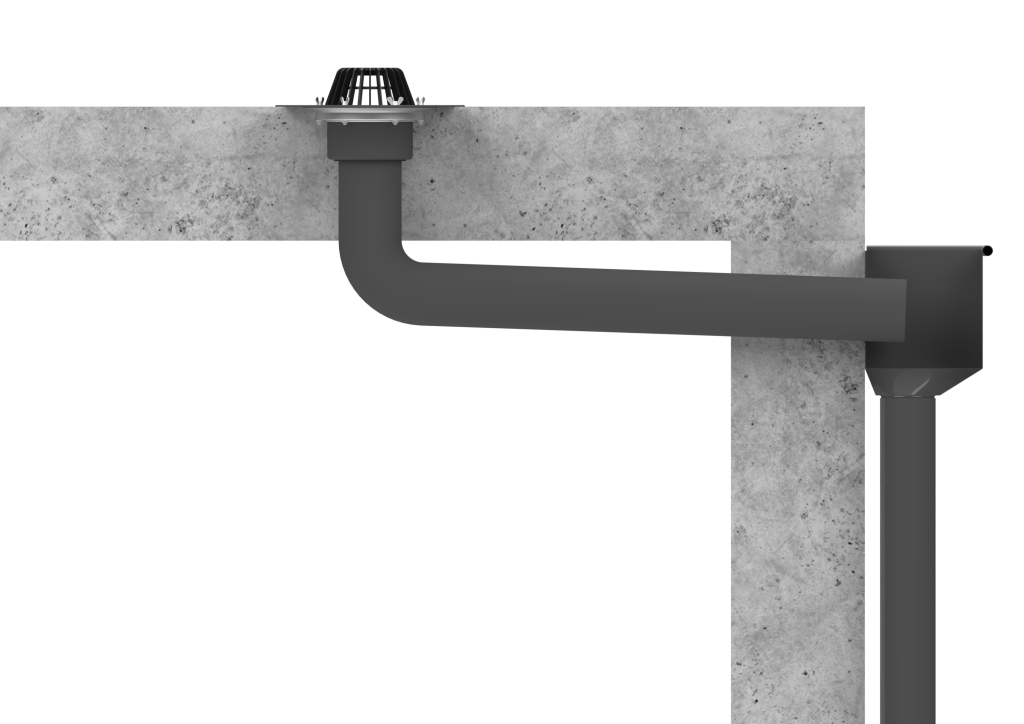
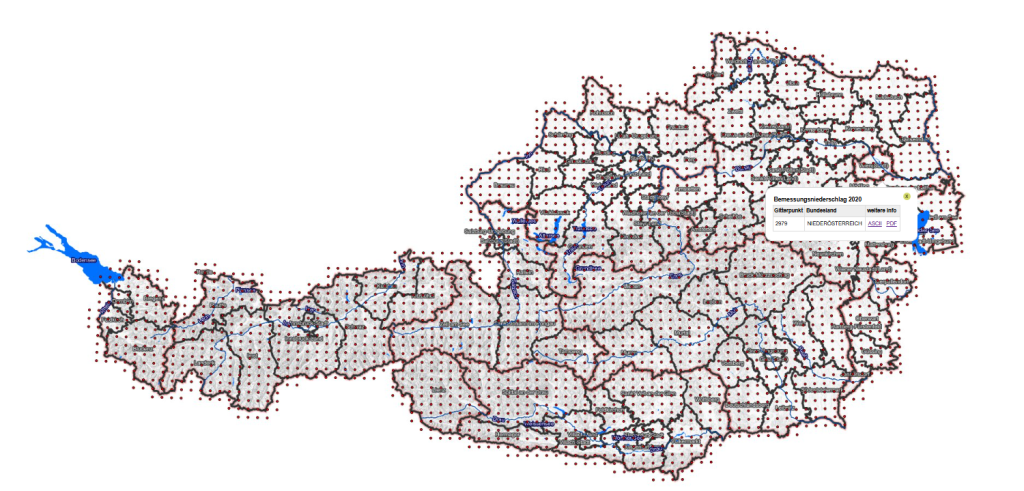
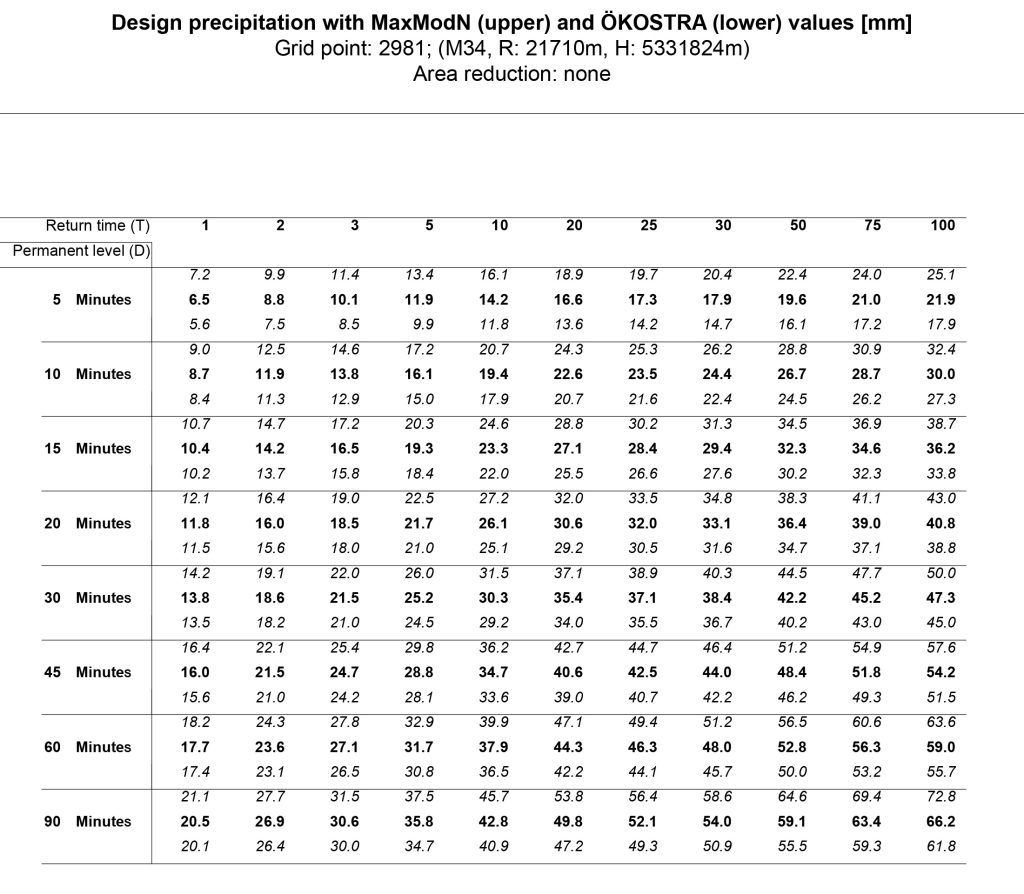
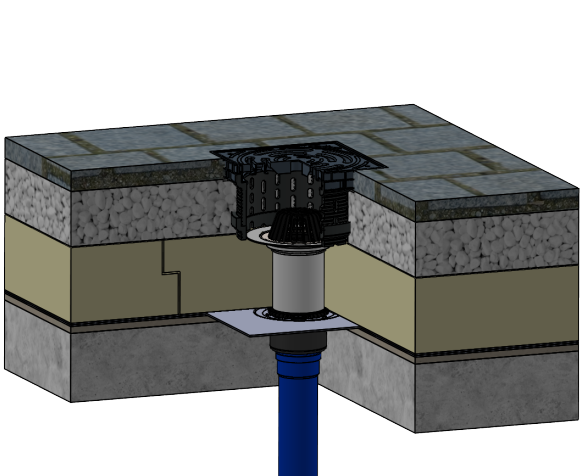
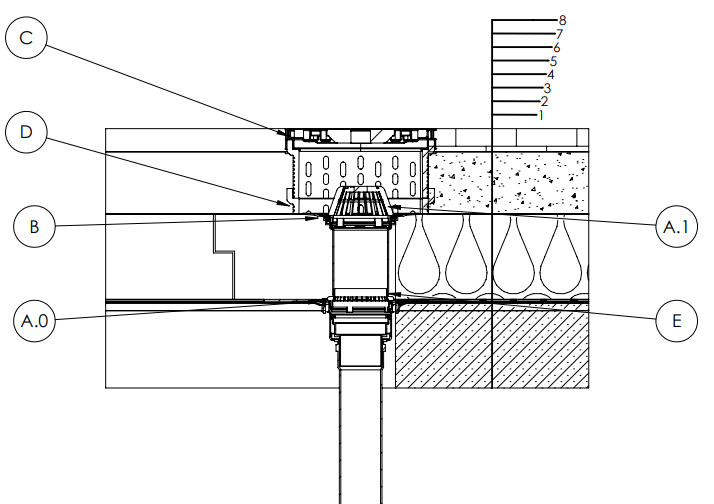
I started working in the HKLS industry in 1997 and have been discussing correct drainage with customers on a daily basis since 2008, so I would like to share my experiences with you at this point. At the same time, as a long-standing member of the Austrian Standards Committee, I keep myself informed about future challenges in building drainage.

Newsletter

Yes, I want to become a siphon technician

I hereby subscribe to the free newsletter to be informed about new articles and to receive further benefits.

Guidelines for the dimensioning of drainage of roof, balcony and terrace areas

This guide provides a comprehensive introduction to the technical requirements and calculations for the dimensioning of drainage systems for roofs, balconies and terraces. The various drainage solutions and their specific advantages and disadvantages are considered in order to ensure reliable and standard-compliant planning. The aim is to use efficient drainage solutions to prevent water damage and flooding and to ensure the long-term functionality and safety of the building.

Heavy rainfall events, which can lead to flooding and damage of buildings, are referred to as extreme weather events, but large amounts of rainfall that occurs locally within a short period of time have almost become the norm. Climate change is often blamed for this – a reality that we have to come to terms with whether we like it or not. This makes it all the more important to carefully plan and implement the rainwater drainage of a building – especially for roofs, balconies and terraces – in accordance with standards in order to avoid water damage. 

Proof of standard-compliant planning of a rainwater system requires a project-specific hydraulic calculation and comprehensive documentation.

Rainwater drainage basics

Before a concrete example of interpretation can be considered, it is essential to know some basics and distinctions.

What does a roof drainage system consist of?
The most important components of a roof drainage system are

  • Roof gutters or roof drains (these must be securely integrated into the building waterproofing)
  • drainage pipes
  • Pipe fastening system
  • Any necessary condensation water insulation of the rainwater pipes
  • Measures for fire, sound and noise protection.


The components selected depend largely on the type of the drainage system chosen. The basic drainage systems available and how they are differentiated will now be discussed.

Differentiation according to drainage method

In rainwater drainage, a basic distinction is made between 2 systems. Both systems differ significantly in terms of pipe layout and pipe dimensioning.

Gravity drainage (gravity principle)
In rainwater drainage, a basic distinction is made between 2 systems. Both systems differ significantly in terms of pipe layout and pipe dimensioning.

During planning, it is assumed that the horizontal rainwater pipes are approximately 70% full of water and the vertical downpipes approximately 33% full of water. These values ​​help to correctly determine the required pipe dimensions.

Figure 1: Scheme of gravity drainage

Vacuum / under pressure drainage (suction principle)
In contrast, negative/under pressure or siphonic roof drainage works according to the principle of full filling. The rainwater is literally sucked off the roof. With small amounts of rainfall, the suction effect only occurs sporadically or not at all, so that the advantages of this system are only fully realised when there is sufficient rainfall.

Figure 2: Scheme of negative pressure drainage

When to use which system?

Today, large, wide-span roof areas are preferably drained using the negative pressure principle, as this system requires less material and labour. Thanks to the slope-free pipe routing under the roof structure, which is permitted with this system, negative pressure drainage offers a space-saving solution, particularly in high-rise warehouses. The planning and calculation of such systems is carried out almost exclusively by the respective system provider.

Not every roof area is suitable for negative pressure drainage, such as roof terraces, balconies or roofs of residential buildings. Conventional drainage may also be the better choice for warehouses or production halls in certain cases.

What are the arguments in favour of conventional/free-flow drainage?

  • The system can be designed by the planner himself in simple steps with the help of EN1253-2 and EN12056-3. There is no dependence on the system provider!
  • In the case of roof structures with a low runoff coefficient, such as green roofs, the rainwater is delayed and released to the drain in smaller quantities, so that full filling cannot be achieved. In this case, a system with pipes laid on a slope makes more sense
  • If the water volume is low and the pipes are laid horizontally without a gradient (negative pressure drainage), the risk of blockages increases as the self-cleaning effect is not achieved due to the lack of full filling. Here too, conventional drainage makes more sense


Which of the two systems ultimately makes the most sense from an economic and technical point of view should always be checked by the planner on a case-by-case basis.

As the design of negative pressure drainage always depends on the system or manufacturer and therefore no generalised statements can be made about planning and implementation, this is not covered in this guide. In the following, the design of gravity drainage will be analysed in detail.

For gravity drainage, however, two further distinctions must be made. One differentiation according to the pipework scheme and one according to the connection method.

Differentiation according to pipe layout

In conventional gravity drainage, an additional important distinguishing feature is the piping layout.

Individual piping connection, closed system
Each roof drain is individually piped to the base pipe in the same dimension without interruption.

Figure 3: Schematic of closed system (individual piping)

Closed system means that the roof outlet is tightly connected to the rainwater pipe as shown in Figure 4. The roof outlet and the pipe must have the same dimensions throughout.

Figure 4 Detail: Closed system

Collective piping, open system
Several roof drains are connected to the ground pipe by means of a collector and downpipe.

Figure 5: Open system, collective piping

An open system means that the roof outlet (as shown in Figure 2) is connected to a horizontal pipe and connected to a larger downpipe that is open on both sides.

Figure 6 Detail: Open system

In principle, it can be assumed that a higher drainage capacity is achieved in closed systems. This is due to the fact that the suction effect is boosted by the pipe being connected in the same dimension throughout.

Guidelines for planning and implementation

Before dimensioning and design can begin, there is some basic information and data on the construction project that must be determined and specified.

This includes:

  • Detailed building plans with areas to be drained
  • Roof structure, waterproofing and materials used
  • Permitted static loads to determine the maximum permissible water accumulation height
  • Address or postal code of the building project (important for the calculation rainfall rate)
  • Piping layout
    • Individual or collective connection piping
    • Closed or open system


Based on this information, the calculated rainfall rate, the runoff coefficient and the drainage capacity of the roof drains used must then be determined.

Calculation rainfall rate (r)
The first step in dimensioning the drainage system is to determine the calculation rainfall rate r. This is the basis for every drainage system.

Figure 7: Austrian grid for rainfall measurement

The roof drainage is to be dimensioned for the 5-minute rainfall event with a 5-year return frequency. As a rule, the design rainfall for the respective location is to be taken from the data sets of the Federal Ministry of Agriculture, Forestry, Environment and Water Management and then converted to a design rainfall rate in l/(s – ha).

The minimum design rainfall for roof areas and property areas is set at 300 litres/(s – ha). Roof drainage is dimensioned in accordance with ÖNORM EN 12056-3:2000, section 4.1. This values can differentiate in specific regions and countries.

Figure 8: 5-minute rainfall rate for the five-year rainfall event in Fischamend (Austria)

Drainage coefficient (C)
Next, the drainage coefficient C must be determined. The drainage coefficient is the ratio between the amount of rain that currently falls on the drainage area and the amount that is actually fed to the drain. The surface quality of the roof surface plays a significant role here. A green roof surface with a drainage coefficient of 0.3, for example, reduces rainwater runoff by about two thirds.

According to ÖNORM B 2501, the following values apply:

  • C = 1,0 for sheet metal roofs, roofs with tile covering, sealed concrete surfaces, foil roofs, paved surfaces with grouted joints, sealed roofs without ballast
  • C = 0,8 for gravel roofs, gravel paths, paved areas without grouting and extensive green roofs with a layer thickness of no more than 8 cm
  • C = 0,5 for reduced extensive greening with a layer thickness of more than 8 cm
  • C = 0,3 for extensive and intensive greening with a layer thickness of 10 cm or more
  • C = 0,1 for intensive greening with a layer thickness of 25 cm or more


Rainwater drainage (Q)
The rainwater quantity Q is calculated from the size of the area to be drained A, the relevant rainfall rate r and the drainage coefficient C and is calculated using the following formula:

This stands for:

  • Q for the rainwater runoff in litres per second (l/s)
  • r for the design rainfall in litres per second and hectare (l/s-ha)
  • A for the effective roof area in square metres (m²)
  • C for the drainage coefficient, which takes into account the retention or delay caused by the roof surface


This calculation indicates the amount of water that the drainage system must be able to reliably discharge per second in order to ensure standard-compliant drainage.

Drainage capacity of the roof drains
According to EN1253-2, manufacturers of roof and attic drains are obliged to display the drainage values in a table or diagram depending on the height above the sealing flange.

Figure 9: Table of drainage capacities tested according to EN 12-53 point 5.5.2.1 on 3m downpipe (i.e. closed system)

The drainage performance depends on whether the system used is an open or closed system. It is therefore important to ask the manufacturer under which test criteria the performance of the respective product is tested.

Calculation examples

Now that the basic principles of roof drainage have been explained, the practical application follows: the dimensioning of the drainage systems. Depending on the type of system – open or closed, individual or collective connection – the calculation approaches differ.

The closed system with collective connection pipework corresponds to the negative pressure principle. As this is dependent on the system and the manufacturer’s specifications, it will not be discussed further in this guide.

In the following, an example of a roof with two different systems will be calculated: One as a closed system with individual connection piping and one as an open system with collective piping.

Initial data
An 800m² flat foil roof with a gradient in one direction is being constructed in Fischamend in the district of Bruck an der Leitha (Austria).

Abbildung 10: Flachdach mit in einer Richtung ausgelegtem Gefälle
Figure 10: Flat roof with slope designed in one direction

Regardless of the system selected, the roof area A, the calculation rainfall rate r, the drainage coefficient C & the rainfall Q can now be determined from this information:

A = Roof area 800 m²

The 5-minute design rainfall rate r for the five-year rainfall event is taken from the hydrographic online service as described above (see Figure 4) and converted to litres per second:

The drainage coefficient C for foil roofs is 1:

The rainwater runoff Q is now calculated from Q = r * A * C:

Layout for closed system (individual piping)

Figure 11: Schematic for closed system incl. Dimensional data

Once the product and the necessary components have been determined, the manufacturer’s drainage rates are used to select the appropriate components.

A drainage rate of 32.0 l/s is required for this example. For this reason, three roof drains in DN110 with a capacity of 32,1 l/s each and an accumulation height of 35 mm are selected (according to the manufacturer’s drainage table in Figure 9).

The dimension of the roof outlet is selected in accordance with EN 1253, whereby the value with an accumulation height of 35 mm is taken into account for the dimensions DN75 and DN110. For the dimensions DN125 and DN160, on the other hand, the value with an accumulation height of 45 mm is used.

The total capacity of the three roof drains in DN110 is 32,1 l/s, which exceeds the required value of 32.0 l/s. Each roof outlet is individually connected to a downpipe with a continuous pipe dimension of DN110.

Note: A schematic diagram of the pipework with the corresponding dimensions must be attached.

Layout for open systems

Figure 12: Schematic for open system incl. Dimensional data

For the open system, the capacity specifications of the roof outlet manufacturer are not decisive for the layout. Instead, the drainage tables in accordance with EN 12056-3 for horizontal base and collection pipes (see Figure 13) and for vertical rainwater downpipes (see Figure 14) should be used.

Planning begins with the required drainage capacity of 32.0 l/s. Two factors are decisive in determining the required number of roof drains:

  • The slope of the horizontal pipe – usually approx. 5 %
  • The pipe diameter of the drain pipe – larger diameters enable higher flow rates


As the slope is predetermined in most cases, the number of drains and the pipe diameter remain variable. The following options result from the table for our example:

  • DN100 → 7 drains (5,1 l/s per drain)
  • DN125 → 4 drains (8,3 l/s per drain)
  • DN150 → 2 drains (15,7 l/s pro drain)


In practice, the variant with 4 drains and DN125 pipes proves to be particularly practical. However, the final decision lies with the planner, who selects the optimum solution depending on the structural conditions, roof geometry and economic aspects.

Figure 13: Drainage capacity of horizontal collection and base pipes (EN12056-3)

Planning begins with the roof outlet furthest away from the downpipe. The following applies:

Individual connection pipes must always retain the predefined diameter.

Example: If it was decided to use four drains with DN125 as described above, all individual connection pipes must also be DN125.

Horizontal collective connection pipes must accommodate the entire water volume of the connected roof drains.

  • As a result, the pipe diameter tends to increase in the direction of flow.
  • Example (see Figure 12):
    • Between the first and second drain, the collective connection pipe can still be designed in DN125..
    • After this, an extension to DN150 is required..
    • In the further course, the pipe must be enlarged to DN200..


For the dimensioning of the vertical rainwater downpipe, a filling level of 0.33 must be used in accordance with EN 12056-3, unless national or regional regulations stipulate a different value (see Figure 14).

Figure 14: Drainage capacity of vertical rainwater downpipes (EN12056-3)

Even if the table from EN 12056-3 (see Figure 14) would allow a smaller pipe diameter here, the diameter of the horizontal collection pipe remains decisive. This means that the downpipe must have at least the diameter of the connected horizontal collection pipe. No reduction of the pipe diameter in the direction of flow is permitted. For our example, this means a pipe diameter of DN200 for the downpipe.

This procedure ensures that the system remains hydraulically efficient and faults are avoided.

The pipe dimensions of the individual sections shown in the pipe diagram (Figure 12) were determined using Figure 13 and Figure 14. Underground pipes or pipes laid under the base plate must also be laid out in accordance with Figure 13.

Open vs. closed system – What should be used?

Which system is ultimately used must be decided by the planner or architect on a case-by-case basis, taking the following aspects into account:

Open system
(collective piping)

Closed system
(individual piping)

Advantages:

  • Less material and labour
  • Less underground construction work


Disadvantages:

  • Less drainage capacity
  • Dimensioning can only be carried out in accordance to the Tables of the EN12056-3

Advantages:

  • Compared to an open system, a significantly higher drainage capacity is achieved
  • The dimensioning and layout of the drain pipe is simple and based exclusively on the drainage values of the roof drains
  • Generally higher operational reliability when draining rainwater from the roof, as each roof outlet is individually connected to a downpipe and if one pipe section is blocked, all the others remain functional


Disadvantages:

  • Higher material and labour costs
  • The higher number of downpipes requires more underground construction work to lay the base pipe

Conclusion

The planning and dimensioning of a roof drainage system requires careful preparation. This includes obtaining all the necessary information in a timely manner, which can sometimes be time-consuming.

Effective rainwater drainage should always be considered as an overall concept – from the drainage of water from roof and property surfaces to discharge into the public sewer or infiltration on the property. Restrictions imposed by the authorities during heavy rainfall to relieve the sewer network make additional measures such as retention or infiltration necessary and present planners with additional challenges.

Another essential component of safe rainwater drainage is emergency drainage, which ensures that no damage is caused to the building even in the event of exceptionally heavy rainfall (rain of the century). You can find more information about emergency drainage here.

Specification of the roof drain to match the roof construction
For an exact specification of the roof drainage system, the HL support team will be happy to help you at support@hl.at or by contacting your regional HL sales representative. All you have to do is request a sectional drawing with the descriptions of the individual sections from the architect or planner and send it to the HL team. Within a short space of time, you will receive a 3D illustration as well as the detail in various formats in addition to the exact sequence specification:

Leave a Reply

Your email address will not be published. Required fields are marked *